Best overall for compatible motorhomes: automatic hydraulic leveling. Best for compatible fifth wheels: automatic electric leveling. Best budget option: interlocking leveling blocks; best for frequent trailer stops: curved leveling ramps. This 2026 guide compares system types so you can choose by RV compatibility, campsite conditions, and setup effort.
- The best rv leveling systems match your chassis, loaded weight, and manufacturer-approved leveling procedure.
- Choose automatic hydraulic leveling for a compatible motorhome when reducing manual setup is your priority.
- Choose automatic electric leveling for a compatible fifth wheel; verify the complete kit’s fit before buying.
- Choose interlocking blocks for flexible manual leveling or curved ramps for controlled tire-supported adjustment.
- Ownopedia recommends separating leveling from stabilization: stabilizers are not lifting jacks unless expressly rated for leveling.
Why this matters
The wrong leveling equipment creates more than an uncomfortable floor. A jack installed at an unapproved mounting point can damage the RV, while a tire-supported system needs enough space and suitable ground to work safely. Neither automation nor a larger-looking jack proves compatibility.
For a 2026 purchase, start with the RV manufacturer’s instructions rather than an accessory’s feature list. Ownopedia provides research, diagnostic, and repair guidance for owners; the decision here starts with what your RV permits, not which controller has the most buttons.
Leveling changes the RV’s attitude; stabilization reduces movement after the RV is level. A stabilizer that removes bounce is not automatically suitable for lifting a low side. Check the equipment’s stated purpose before applying load.
If you are still choosing the RV itself, review RV brands for reliability alongside the leveling equipment fitted to the particular unit. A brand-level shortlist does not establish which system an individual RV carries.
What makes the best RV leveling systems
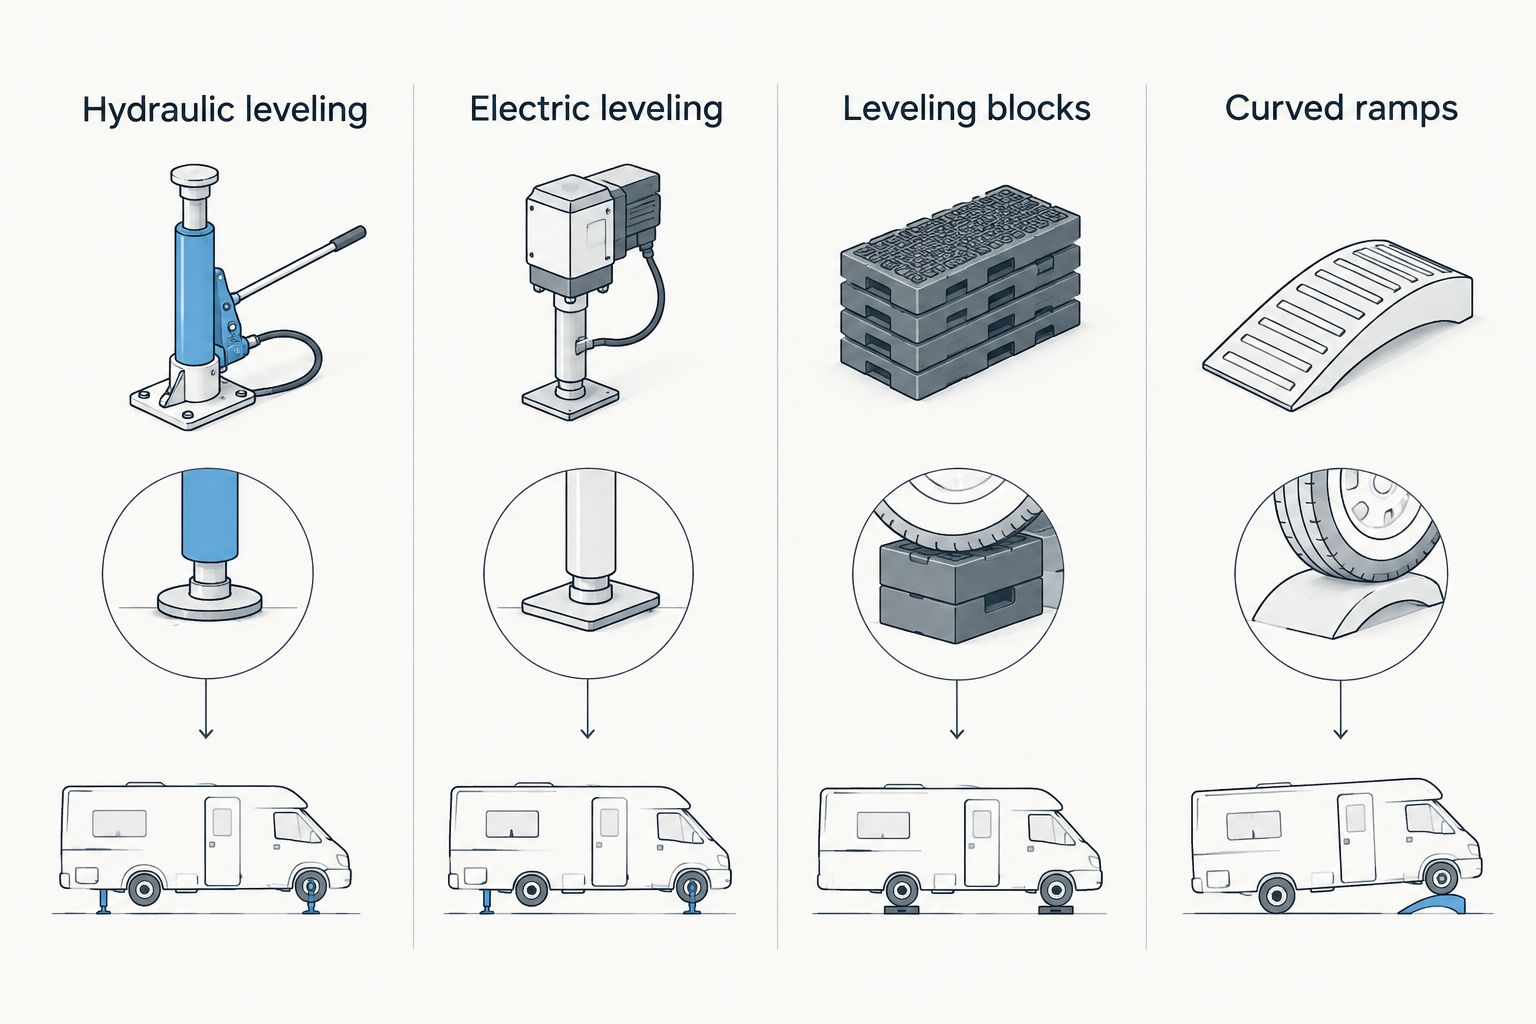
Judge these 4 system types against the same criteria before choosing manual or automatic operation:
- Approved fit: The system must suit the RV’s chassis, mounting points, suspension, and manufacturer-approved lifting procedure.
- Load suitability: Confirm the complete system’s application rating and each component’s limits. Do not select equipment by adding jack ratings together.
- Ground contact: Jack feet, pads, blocks, and ramps need stable support. Equipment capacity does not make soft ground safe.
- Adjustment control: You need a way to check level in 2 axes: side-to-side and front-to-back.
- Setup and recovery: Compare normal operation with the documented procedure for a power loss, fault, or jack that will not retract.
- Inspection access: You should be able to inspect the equipment, read its labels, and reach required service points.
The best system is the one that meets those requirements with a setup routine you will actually follow. Automation removes some manual work; it does not remove the need to inspect the campsite.
RV leveling systems at a glance
| System type | Best for | Standout feature | Key limitation |
|---|---|---|---|
| Hydraulic leveling | Compatible motorhomes | Powered jacks with automatic leveling on suitably equipped systems | Installation and operation depend on approved chassis fit |
| Electric leveling | Compatible fifth wheels | Electrically driven leveling jacks with coordinated control on suitably equipped systems | Requires suitable mounting, electrical supply, and a documented recovery procedure |
| Leveling blocks | Owners prioritizing a simple manual setup | Modular tire-supported height adjustment | Requires positioning, checking, and sometimes repositioning |
| Curved ramps | Trailer owners making frequent stops | Tire height changes as the wheel moves along the curve | Tire spacing, ground conditions, and permitted lift limit suitability |
These are system-category recommendations, not a ranking of individual kits. A system that fits one RV is not a recommendation for another RV with a similar appearance or length.
1. Automatic hydraulic leveling: best for compatible motorhomes
Automatic hydraulic leveling uses hydraulic pressure to extend and retract leveling jacks. On a suitably equipped system, a controller uses level sensing to coordinate adjustment. The installation still needs approved mounting locations and an application matched to the motorhome.
Best for: Motorhome owners whose RV supports hydraulic leveling and who want powered adjustment instead of driving repeatedly onto tire supports.
Automatic hydraulic leveling pros
- Powered adjustment reduces the need to reposition the RV onto blocks.
- Automatic operation coordinates leveling through a controller.
- Ground-level controls, where fitted, let you observe the surrounding setup area.
Automatic hydraulic leveling cons
- Hydraulic hoses, connections, and seals add inspection points.
- Retrofitting requires confirmation of chassis fit, clearance, and installation requirements.
- Soft ground still needs an approved support solution beneath the jack feet.
Before buying in 2026, request the installation instructions and operating manual for the exact system. Confirm whether the RV manufacturer permits its installation, then check jack placement, stowed clearance, and the required electrical supply.
Read the emergency-retraction procedure before you need it. Know which tools the procedure requires and where they will be stored. Automatic operation is useful only when you also understand the system’s limits.
Verdict: Buy automatic hydraulic leveling for an explicitly compatible motorhome; skip an unverified retrofit.
2. Automatic electric leveling: best for compatible fifth wheels
Automatic electric leveling uses electrically driven jacks to change the RV’s attitude. Compatible systems coordinate the leveling points through a controller rather than requiring you to adjust each point independently. The exact sequence and permitted adjustments come from the system manual.
Best for: Fifth-wheel owners whose trailer supports an electric leveling installation and who want coordinated powered setup.
Automatic electric leveling pros
- Powered jacks reduce manual adjustment at individual leveling points.
- Electric actuation avoids the hydraulic hoses used by hydraulic systems.
- Automatic control provides a repeatable operating sequence when used as instructed.
Automatic electric leveling cons
- Motors, wiring, connectors, and controls require inspection and fault diagnosis.
- Battery condition and electrical connections affect powered operation.
- Existing landing gear or stabilizers do not establish compatibility with a replacement leveling kit.
For a 2026 retrofit, verify the exact frame application rather than choosing by trailer weight alone. Ask whether the installation requires frame brackets, wiring changes, controller calibration, or removal of existing equipment.
Also check the procedure for unhitching, leveling, and returning to hitch height. A system’s memory function, if present, does not replace visual checks of hitch alignment and engagement. Keep people clear of moving equipment during adjustment.
Verdict: Buy automatic electric leveling for a confirmed fifth-wheel application; hold the purchase until mounting and electrical requirements are clear.
3. Interlocking leveling blocks: best for a simple manual setup
Interlocking leveling blocks support tires at a raised height. You arrange the blocks according to their instructions, position the RV, and check the result. On a travel trailer, tire supports commonly address side-to-side level before the tongue jack adjusts front-to-back level, following the trailer manufacturer’s procedure.
Best for: Owners who want tire-supported leveling without adding a permanently installed powered system.
Interlocking leveling blocks pros
- No powered actuators, hydraulic lines, or controller are required.
- Modular pieces let you change the support arrangement within the product’s instructions.
- Portable equipment can be inspected before each setup.
Interlocking leveling blocks cons
- You must place the blocks and move the RV onto them.
- The available height increments do not provide continuous adjustment.
- Incorrect stacking, incomplete tire support, or unsuitable ground defeats the setup.
Check the block manufacturer’s requirements for tire coverage, stacking pattern, maximum permitted arrangement, and loaded application. Dual tires and closely spaced axles need particular attention; do not assume a block arrangement suitable for a single tire supports every wheel configuration.
Distinguish blocks intended for tires from pads intended for jack feet. Some products support both uses under specified conditions, but appearance alone does not establish that permission. Inspect for cracks or deformation before loading.
Verdict: Buy interlocking leveling blocks for a straightforward manual setup; skip arrangements that leave tires inadequately supported.
4. Curved leveling ramps: best for frequent trailer stops
Curved leveling ramps raise a tire progressively as you move the trailer along the ramp. You stop at the required position and secure the setup using the equipment and sequence specified by the manufacturer. This gives a different adjustment method from selecting a fixed block stack.
Best for: Trailer owners who prefer adjusting tire height through controlled movement rather than rebuilding a stack of blocks.
Curved leveling ramps pros
- Tire height changes along the ramp’s curve.
- Adjustment does not require choosing between fixed stack heights.
- The ramp position gives you a visible reference during setup.
Curved leveling ramps cons
- Closely spaced tires can restrict placement and removal.
- Ramp movement or sinking prevents a secure setup.
- The ramp’s permitted lift and application limit which sites and RVs it suits.
Measure the available space around the tires before choosing a ramp. Check the manufacturer’s fit instructions for tandem-axle applications, and never trim or modify a ramp unless its instructions expressly permit that modification.
Use a spotter when visibility requires one, with agreed signals and a safe standing position. Never put hands between a loaded tire and ramp. If the site demands adjustment beyond the equipment’s permitted range, choose another position instead.
Verdict: Buy curved leveling ramps for a compatible trailer and suitable campsite; skip them when tire clearance or required lift exceeds their limits.
How these systems were ranked
Ownopedia’s 2026 RV leveling systems recommendations prioritize approved fit, load suitability, ground contact, adjustment control, recovery procedures, and inspection access. Automatic systems receive separate motorhome and fifth-wheel recommendations because their installation requirements are not interchangeable.
Blocks and ramps earn different manual-use slots: blocks suit owners who prefer modular supports, while ramps suit owners who prefer progressive adjustment through tire movement. Neither manual approach replaces the trailer’s approved front-to-back leveling procedure.
Ownopedia’s RV leveling systems guide is best for owners deciding between powered jacks and tire-supported leveling. The category winner is a starting point; the exact equipment must pass the compatibility checks.
Check your setup before settling in
Follow the RV and leveling-equipment manuals in their specified order. Slide-out operation, suspension settings, parking brakes, chocking, and hitching procedures are vehicle-specific; a generic checklist must not override them.
Use these checks around that required sequence:
- Ground check: Look for soft areas, slopes, voids, and obstacles beneath the intended support points.
- Equipment check: Inspect jacks, supports, wiring, hoses, and visible fasteners before applying load.
- Level check: Confirm side-to-side and front-to-back attitude at the manufacturer’s specified reference point.
- Clearance check: Keep people and objects outside the movement area.
- Final walkaround: Check support contact and the completed setup before using the RV normally.
Make 1 final walkaround part of every arrival. If a support is sinking or shifting, stop and correct the setup according to the manuals. Do not compensate by extending equipment beyond its permitted travel.
Which RV leveling system should you choose?
Choose the simplest approved system that meets your setup needs. For an undecided trailer owner, start by checking whether blocks or curved ramps cover the intended use. Consider a powered retrofit only after confirming that the RV supports it.
For a motorhome already equipped with automatic leveling, understand and inspect the installed system before shopping for a replacement. A fault calls for diagnosis, not an assumption that a different system type will fit.
For your 2026 shortlist, require an exact application match, readable operating instructions, and a recovery procedure you understand. Reject any option that fails those checks, regardless of how convenient its normal operation appears.
FAQ
What are the best RV leveling systems for a motorhome?
Automatic hydraulic leveling is the recommended category for a motorhome that expressly supports that installation. Confirm the exact chassis application, operating limits, and emergency-retraction procedure before choosing a kit.
Are hydraulic leveling systems better than electric leveling systems?
Neither hydraulic nor electric leveling is universally better. Choose the system approved for your RV’s chassis and application, then compare installation requirements, inspection access, and recovery procedures.
Can I use stabilizer jacks to level my travel trailer?
Use stabilizer jacks for leveling only when the RV and jack manufacturers expressly authorize that use. Equipment intended only to reduce movement must not be treated as lifting equipment.
Are curved leveling ramps better than leveling blocks?
Curved ramps suit owners who prefer progressive tire-height adjustment, while blocks suit owners who prefer modular supports. Tire spacing, required lift, ground conditions, and the equipment’s instructions determine which option fits.
Can I add automatic leveling to an RV that does not have it?
Add automatic leveling only when the exact installation is approved for your RV. Confirm mounting, clearance, electrical requirements, and any frame restrictions before purchasing equipment.
Do I still need wheel chocks when using leveling equipment?
Follow the RV and leveling-equipment instructions for wheel chocking. A level indicator does not establish that the RV is secured against rolling.
Should I level my RV before extending the slide-outs?
Follow your RV manufacturer’s specified order for leveling and slide-out operation. Do not substitute a generic procedure for the instructions covering your particular RV.
What should I do if a leveling jack starts sinking?
Stop the setup and follow the manufacturer’s procedure for unloading and correcting the support. Do not keep extending the jack to compensate for unstable ground.
One last thing
A perfectly centered bubble does not prove a safe setup. Level is an orientation measurement, not a check of ground strength, tire restraint, or jack loading. Before your next trip, find the recovery instructions for your leveling equipment and keep them accessible without an internet connection.